I am so very late to the pumpkin party! I just hope I'm not too late and you've all overdosed on it already. I have a good excuse for being late... I really do. I am 3 1/2 months pregnant with twins and morning sickness has been in full swing. You have to feel bad for me. Just think of all the awesome Fall recipes I missed out on.
My first pumpkin recipe of the Fall involves pumpkin (duh!), cheesecake and caramel. Introducing Mini Pumpkin Cheesecake Cups...
These single serving size cups are made in a muffin tin. I used a large cupped tin but you can use whatever size you'd like. You can also check out the
original recipe if you want to make a traditional cheesecake.
Because I love experimenting, I made these with a Cinnamon Toast Crunch crust. The result was quite tasty. The options of cookies, crackers, cereal you can use for a crust are endless!
Pumpkin Cheesecake Cups (original recipe:
Once Upon A Chef)
Makes 6 in a large muffin pan
Cinnamon
Toast Crunch Crust
4 cups
Cinnamon Toast Crunch cereal
4 tbsp
butter, melted
Pumpkin
Cheesecake
5oz canned
pumpkin
1/2 cup
granulated sugar
1/8 tsp
ground ginger
1/4 tsp
ground cinnamon
1/8 tsp
ground nutmeg
1/8 tsp
ground cloves
Dash of salt
1/3 cup
heavy cream
8oz cream
cheese, room temp
2 eggs, room
temp
Caramel
Sauce (microwave!)
1 cup
granulated sugar
2 tbsp light
corn syrup
2 tbsp water
1/8 tsp
lemon juice
1/2 cup
heavy cream
1 tbsp
butter
To make
the crust:
Ground the
cereal into fine crumbs. Pour in the melted butter and stir together.
Preheat oven
to 325. Prepare a large muffin pan by rubbing olive oil into each muffin
cup.
Divide the
cereal mixture into each muffin cup. You may have a little left over.
Bake crust
for about 8 minutes. Let cool while you prepare the cheesecake.
To make
the cheesecake:
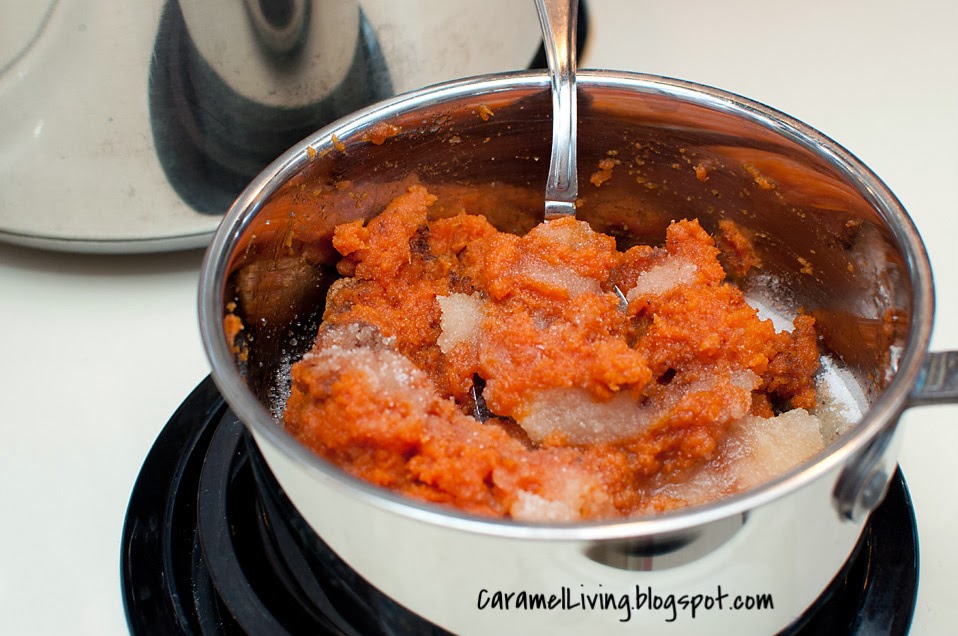
Combine
pumpkin, sugar, ginger, cinnamon, nutmeg, cloves and salt in a saucepan. Cook
on med-high heat, stirring constantly, until mixture begins to sputter. Reduce
to med-low heat and stir constantly for another 5 minutes or until the mixture
has become a rich brown color and thickened.
Pour into
bowl and mix for one minute. Pour in heavy cream while mixer is on. Mix evenly.
Add chunks of cream cheese and blend until smooth. This took quite a
while for me and honestly it was still a little chunky when I decided enough
was enough. The original recipe suggests using a food processor. I think it
would be the preferred method in order to get the mixture smooth and to avoid
chunky bits of cream cheese.
Add eggs
and stir just until combined. Overmixing will cause the cheesecake to rise and
crack.
Spoon the
cheesecake mix into the muffin cups (on top of the crust).
We are going to bake this
cheesecake in a water bath. The bath allows the cheesecake to cook evenly and
helps to avoid it from cracking. Wrap the bottom of the muffin pan in foil.
Fill a cake pan with water. Just enough so it doesn't overflow once you add the prepared muffin tin.
Bake cheesecake for
about 1 hour or until the cheesecake is no longer jiggling. Remove from oven
and let cool for about 1/2 hour. Place in the refrigerator to chill for at
least 4 hours.
To make
the caramel sauce:
Seriously, this recipe so easy and the sauce it absolutely wonderful!
Stir
together sugar, syrup, water and lemon juice. Microwave until the caramel is
pale yellow, or just barely starting to take on some color, 4-8 minutes
(depending on the strength of your microwave). It's fine to stop and open the
microwave to check often; just don't let it get too dark or it will burn.
Let
the caramel sit for about 5 minutes -- it will gradually turn a rich amber
color. (If after five minutes, it's not dark enough, place it back in the
microwave for thirty seconds or so, then let it darken again. If it gets too
dark, start over.)
In the
meantime, heat the cream in the microwave until hot. Once the caramel reaches
the right color, add the hot cream a few tablespoons at a time. It will bubble
up intensely, but won't overflow.
After you've added all the cream, stir to
incorporate then add the butter. Add more cream if the mixture seems too thick.
Once the caramel cools, you can store it in your fridge.
When you are
ready to serve, carefully slide a butter knife around the edges of the
cheesecake and gently loosen it from the pan. Top with whip cream, caramel and
a dash of cinnamon.
Enjoy!