Showing posts with label holiday goodies. Show all posts

Tuesday, December 24, 2013

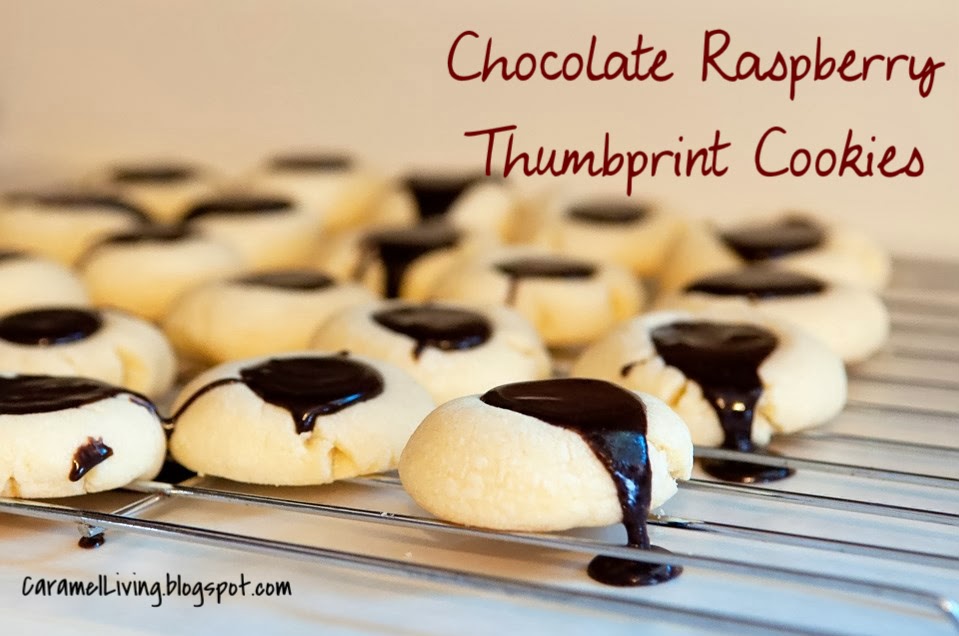
Chocolate Raspberry Thumbprint Cookies

I love myself some thumbprint cookies. Like... I really really love them. The texture is just right, they are soft and crumbly. The taste of the cookie is simple yet very delicious. The little bit of almond extract adds a perfect little perk to these delights. Once you add your melted chocolate to the top... hold on to your shorts, toupees, glasses or whatever else you don't want flying off your body. Yes, they are that good.


So here we go...

Cookies (adapted recipe from here):
1 cup butter
1 cup powdered sugar
2 egg yolks
1 tsp vanilla
1/2 tsp almond extract
2 1/4 cup flour
1/2 tsp baking powder
1/4 tsp salt

Melted chocolate topping:
1 cup dark chocolate raspberry baking chips
4 tbsp heavy whipping cream


Cream together butter and powdered sugar until the texture is smooth. Add egg yolks, vanilla extract and almond extract. Mix well. In a separate bowl combine flour, baking powder and salt. Slowly add the flour mixture to the butter/sugar mixture.

Preheat oven to 350 and prepare a cookie sheet by using parchment paper or by spraying the sheet with a light coating of cooking spray.

Roll dough into small balls, about 1 inch. Place on cookie sheet and press a small indent into the dough ball. Use your thumb or the handle of a wooden spoon.

Bake cookies for 10 minutes. Remove from oven and let them rest on the pan for a minute or two before moving them to the cooling rack.

For the topping, combine chips and cream together in a microwaveable bowl. Start by microwaving the two ingredients for 1 minute. Remove and stir together. Keep microwaving until the chocolate has a smooth texture.

I let the cookies cool for about 45 minutes before adding the chocolate. I waited 2 seconds, maybe less, to eat one. The chocolate eventually hardens but I can not resist eating at least one cookie with all of its melted chocolate goodness. I used a spoon to drip the chocolate into the indent of the cookie. Another way is to pour the chocolate into a Ziploc bag and cut off a small corner and squeeze the chocolate onto the cookie.


Thursday, December 5, 2013

Peppermint Hot Cocoa Blossoms

Do love a good chocolate and peppermint candy cane combination? If so, these cookies are exactly what you have been looking for! A chocolate cookie topped with a Candy Cane Hersey's Kiss. They are like little drops of deliciousness.


Don't like mint? No worries, I am not much of a fan either. I make mint goodies because I know my family and friends enjoy it. So if you're not diggin' the mint... try substituting a Hug Hersey's Kiss or maybe a Caramel Hersey's Kiss. Top it anyway you like it. Go ahead and be creative.

Peppermint Hot Cocoa Blossoms

2 cups flour
1/4 tsp baking soda
1/4 tsp salt
1/3 cup cocoa
1/2 cup (1 stick) butter, softened
1 cup sugar

1 egg
1 1/4 tsp vanilla
2 tbsp milk

1 bag Candy Cane Hersey's Kisses
Small bowl of powdered sugar

Add flour, baking soda, salt and cocoa together in a medium mixing bowl. Cream together sugar and butter. Add the egg. Mix well. Add vanilla. Mix well. Add about 1/2 of the flour mixture to the sugar mixture and mix. Add 1 tbsp of milk as it mixes. Add the remaining flour mixture and mix. Add in last tbsp pf milk as it mixes.

The dough is very easy to play with and doesn't require any refrigeration to firm it up. Roll dough into 1 inch balls. Roll balls in powdered sugar and bake for 8-10 minutes. Remove cookies while they are still soft and let them rest for 2 or 3 minutes. Add the Candy Cane Kiss and move to a cooling rack.


I also made these cookies without the chocolate. The ingredients and instructions are exactly the same except the addition of cocoa powder and instead of powdered sugar I used red sugar sprinkles. This recipe is on the back of the Candy Cane Kiss bag.


Wednesday, November 27, 2013

Pumpkin Bread

My house smells amazing right now. I wish I could somehow share this aroma with you. I've got pumpkin bread baking and it's a scent that should be bottled. Yeah, companies try to bottle it or make candles that kind of compare. While they usually smell pretty good... those products just don't quite cut it.


Pumpkin Bread

2 cups flour
1 tsp baking soda
1 tsp salt
1/4 tsp allspice
1/4 tsp nutmeg
1/2 tsp ground cinnamon
3/4 cup brown sugar
1 stick of butter, unsalted
2 eggs
15 oz can of pumpkin

White sugar
Ground cinnamon

In small bowl, combine flour, baking soda, salt and spices. Loosely stir together. In a mixing bowl, cream together brown sugar and butter. Mix in eggs, one at a time. Mix in pumpkin. Mix in flour little by little.
Just look at that beautiful batter!
Preheat oven to 350. Prepare bread pans by rubbing olive oil all around the inside. I used two medium size pans. One large pan or 4 mini pans would be great too. Just keep in mind your bake time will vary. Pour the batter into the pan and sprinkle white sugar and cinnamon over the top.


Bake for 30 minutes or until the middle comes out clean when checked with a knife. Remove from oven and let it rest for a few minutes. Loosen the sides with a knife or spatula. Flip the pan over holding a hand over the bread. Place bread on cooling rack.


Wait until the bread has cooled a bit before cutting into it. But DO eat some while it's still warm. You can spread on some butter or cream cheese frosting or a cinnamon glaze or add nothing at all.


Enjoy! 


Tuesday, November 19, 2013

Carrot Cake Whoopie Pies

Back in May I donated "one baked good once a month for a year" to an auction held at our church with proceeds going to my daughter's youth group mission trip. I was excited right away about the all of the different options I had to chose from. I went Pinterest shopping, but up until now I hadn't ventured too much out of my past experiments.


Some of the recipes I've made are:

Pumpkin Bread with a cinnamon glaze (missed an opportunity to blog this one)
Peanut Butter Chocolate Chip Muffins
Better Than Sex Cake with caramel and Rolos
Scones


This month I made Carrot Cake Whoopie Pies. My original plan was to make everything homemade but in the end I realized time wise that wasn't going to work. I then decided to use a cake mix in place of a from-scratch dough. It made the process very painless and quick.


What you'll need:
copycat from What's Baking in the Barbershop?

Carrot Cake Cookies
One box of carrot cake cake mix
2 eggs
1/4 cup vegetable oil

Cream Cheese Frosting
8oz cream cheese, softened
5 Tbsp butter, softened
2 tsp vanilla
2 1/2 cups powered sugar
1 tsp fresh lemon juice

For the cookies:

Mix together cake mix, eggs and oil. It seems a little sticky in the beginning but just keep whisking or stirring and it will come together nicely.

Preheat oven to 375. Prepare a cookie sheet with spray, parchment paper or a baking mat. Spoon dough onto the pan. I used two spoons. One to spoon it out of the bowl and the other to guide it off the spoon and onto the pan. Bake for about 9-10 minutes. Remove from oven and let rest for 2-3 minutes. Place on baking rack to cool.


For the frosting:


In a stand mixer, combine cream cheese and butter. Cream together. Mix in vanilla. Slowly add the powdered sugar. Finally mix in lemon juice. Place in  refrigerator 25-30 minutes.

Put them together:

Once cookies are completely cool and frosting has set, it's time to make the whoopie pie. Find cookies that are roughly the same size. Spread a generous amount of frosting on the bottom of one cookie. Gently press the other cookie on top of the frosting. There you go! You are done and your tummy will be pleased. Pleased indeed!


Thursday, November 7, 2013

Pumpkin Kiss Snickerdoodle Cookies

Snickerdoodle and pumpkin make the perfect marriage in these cookies. I discovered Pumpkin Kisses last Fall. Alone the Kisses are okay.... very pumpkin-y. But together with the right cookies or bars they are super duper!


Snickerdoodle cookies original recipe from Lovin' From The Oven


1/2 cup butter, softened
1/2 cup white sugar
1/3 cup brown sugar
1 egg
1/2 tsp vanilla
1 1/2 cups flour
1/4 tsp salt
1/2 tsp baking soda
1/4 tsp cream of tartar

2 tbsp white sugar
1 tsp ground cinnamon

Bag of Pumpkin Flavored Hershey's Kisses

In a bowl, combine flour, salt, baking and cream of tartar. Set aside. In another bowl, cream together sugars and butter. Add egg and mix. Add vanilla and mix again. Slowly mix in flour mixture.

Place dough in the refrigerator to firm up for about 30 mins.

Preheat oven to 300. Prepare a cookie sheet with parchment paper or a baking mat.

In a small bowl, combine sugar and cinnamon. Roll each dough into the sugar/cinnamon before placing it on the cookie sheet. Bake for 12-14 minutes. Cookies may seem undercooked but they will firm up. 

These cookies are amazing even without the Kiss

Once out of the oven, add the kiss. 


Enjoy!

Thursday, June 27, 2013

Firecracker Cake


Looking for a fun dessert to make for your 4th of July festivities? A few years ago I made this Firecracker Cake for my friends' party at the lake and it was a huge hit!  What makes it so fun? The cake and frosting are multi-colored, but it is also topped with sprinkles and Pop Rocks!  Have the kids in your life been introduced to Pop Rocks? Mine thought they were amazing.

I actually made the cake from scratch but it didn't hold the colors well so I would recommend just using a box mix. 

*** Firecracker Cake ***
From Cooking with Sugar

1 box white cake mix
1 cup Greek yogurt
1 container whipped white frosting
Red and blue food coloring
Red, white and blue sprinkles
Pop Rocks candy (I found them at the dollar store)

Preheat oven and prepare cake mix according to cake mix directions. Add Greek yogurt and mix well. Grease a 12 cup bundt pan. Add red food coloring to 1 cup batter in small bowl. Add blue food coloring to 1 cup batter in a separate bowl. Pour red batter on the bottom of the pan, then pour white batter, and lastly pour blue batter in a circle around the middle of the pan. Do not mix! Bake according to directions, cool slightly and remove cake onto plate.  Let it cool completely before frosting.

Divide the frosting into 3 separate bowls. Warm one bowl of white frosting for 5-10 seconds in the microwave and drizzle over the cake. Warm second bowl, add red coloring, drizzle over cake and do the same with the blue coloring.  Top with sprinkles and Pop Rocks! If you are not serving the cake immediately, wait to add the Pop Rocks so your guests can get the full effect of the “firecrackers.” :) 

Have a sunny and safe holiday!


Sugar Cookie Sandwiches


Sparklers, celebration and food!! Fourth of July is such a great time of the year. We typically head over to my parents’ cabin for the Fourth. We swim, go for boat rides, eat and be merry. There is a Fourth of July boat parade which is a blast because a water fight with water balloons and water guns is bound to happen between the boats and viewers.

Fourth of July = FUN, yummy treats and more fun and more yummy treats!


Today I have a fun cookie, along with a kick butt frosting recipe, to add to your holiday menu. These cookies are cute, fun and delicious. Like I’ve mentioned, oh I don't know... a few hundreds time, I enjoy a soft and chewy sugar cookie. The recipe that follows will leave you with just that. 

Sugar Cookie Sandwiches

  • 2 ¾ cups all-purpose flour
  • 1 tsp baking soda
  • ½ tsp baking powder
  • 1 ½ cups white sugar
  • 1 cup butter, softened
  • 1 egg
  • 1 tsp vanilla

  • Blue food coloring
  • Red food coloring
  • Sprinkles
Preheat oven to 350. Prepare cookie sheet with a baking mat or parchment paper. 

Combine flour, baking soda and baking power in a bowl and set aside. In another bowl, cream together butter and sugar. Mix in egg and vanilla. Gradually add flour mixture to sugar mixture. I usually do this in three steps… add a bit of flour, mix well and repeat two more times.

Separate dough into two even halves and place them in separate mixing bowls. Add red food coloring to one half and blue to the other. I used about 1/2-3/4 tbsp of each color.


Roll dough into large blueberry size balls. Really you can make them any size but this size makes them easy to pop. And by pop I mean… into my mouth.  Roll the small balls in sugar sprinkles and place on the prepared cookie sheet. 


Bake cookies for about 3-5 minutes, remove from oven and let them rest on the cookie sheet for another 2 minutes. I take my cookies out of the oven while they are still quite soft looking. They will continue to “bake” a little longer as they rest. (Note:  If you enjoy a crisp cookie, bake them a little longer)

These little guys are about the size of a quarter
Once the cookies are completely cool we can build our sandwiches. This frosting is amazing and very versatile. It can be used on cakes, cupcakes, cookies, you name it. It's light and creamy, but also sets very nicely and doesn't run like other whipped frostings I've tried. If you are looking for a new frosting recipe, here it is!


Whipped Cream Frosting (original recipe) :

1 8oz cream cheese, softened
1/4 cup white sugar
1/2 tsp vanilla extract
1/4 tsp almond extract
1 cup heavy cream

Blend together cream cheese, sugar, vanilla extract and almond extract. Once the texture is creamy slowly whisk in heavy cream. Whisk until it reaches a stiff peak. I whisked mine for about 6 minutes.


To build the sandwiches, take one cookie and apply frosting to the top. Take another cookie and gently press the bottom side down on to the frosted cookie. There you go. Your cookie sandwich is complete.


You can eat these cookies right away or chill them. I like them better chilled.


Since I didn't 100 mini size cookie sandwiches I made some larger ones too. I combined one red doughball and one blue doughball.


 As they baked they attached to one another giving me these:


The kids LOVED these. Even more than the cookie sandwiches!


Enjoy!

Monday, February 4, 2013

Sweetheart Sugar Cookies

Just in time for Valentine's Day. These sugar cookies are simple and delicious making them simply delicious. Haha! Yeah, I'm a dork like that.

Sugar cookies are my favorite cookie. The only catch is they must be soft and chewy. I am not a fan of hard, crunchy cookies. I've been making these sugar cookies for quite a few years. I usually make a bunch and freeze them. They are a nice treat to pull out when you have unexpected company or when you need to quiet a sweet tooth monster within yourself.

In preparation of the upcoming Day of Love, I made pink heart-shaped cookies. That's another fun thing about these cookies... you can add food coloring and cut them into any shape you'd like. Fun, fun, fun.


Sweetheart Sugar Cookies

2 3/4 cups all-purpose flour
1 tsp baking soda
1/2 tsp baking powder
1 cup butter
1 1/2 cups white sugar
1 egg
1 tsp vanilla

red food coloring
heart-shaped cookie cutter
white sugar crystals

Preheat oven to 375 and line cookie sheet with parchment paper or silicone baking mat.

Combine flour, soda and powder. In a separate bowl, cream together sugar, vanilla and softened butter. Add egg to sugar mixture and mix well. Add flour mixture to sugar mixture in small amounts (add a little, mix, add a little, mix, etc.). Once everything is mixed together add a few drops of food coloring.


Roll out the dough and put that cookie cutter to work.  Sprinkle sugar crystals on each cookie.


Bake for 10ish minutes. Do not over-bake these cookies. I pull them out of the oven while they are slightly under-baked. Use a cookie spatula to wiggle them from their spots, but leave them on the cookie sheet for a minute or two before moving them to a cooling rack.

Lastly, eat and enjoy!


Sunday, December 23, 2012

More Cookies...

So here its been a week since I hosted my annual baking day and I'm just now sharing some of my recipes.  Anyone else out there need another week until Christmas???  Sometimes I feel like I'm the only one that doesn't have all my shopping done the day after Thanksgiving.  I don't like to rush the holidays and to be honest, my time management skills seemed to have disappeared when I became a parent.  I do make my annual baking day a priority though no matter how frazzled I feel in December.  I've been hosting it ever since college.  I've kept it primarily with the same group of gals but the process has definitely evolved over the years.  Currently, everyone makes 2-3 cookies/candies at home and then brings 1-2 recipes (and the ingredients) to make with the group.  We enjoy baking together so we didn't want to eliminate the baking fun but it takes TOO long to bake everything together.  Please feel free to share in the comments how your cookie exchange works!

This year, I was excited to try the Mint Oreo Truffle recipe I found in the magical land of Pinterest.  You can find that recipe here.  Oh my word were those babies good.  I'll save that recipe to make any time I'm in the doghouse with Studmuffin.

Next little goodie I've seen using Nutter Butters but my youngest has a peanut sensitivity so I had to find something else for the base.  I think these Rudolph Mallows turned out pretty cute and were yummy.  There's no formal recipe - I melted chocolate almond bark, dipped marshmallows in it and placed halved pretzels and red M&Ms to make the antlers and noses.


Ok, these are one of my favorites from my childhood.  My aunt introduced Cream Wafers one year at a holiday gathering and I was hooked.  Just a heads up, the dough is very pesky but they are so worth the hassle.


Cream Wafers
Cookie
1 c. butter at room temp
1/3 c. whipping cream
2 c. flour
small bowl of approx. 1/2 c. sugar

Mix well, cover & chill.  Roll about 1/3 of the dough on floured surface to about 1/8 inch thick.  Cut into 1 1/2 inch circles and set both sides into sugar bowl to lightly cover. After placing on baking sheet, prick each cookie a few times with a fork.  Cook 7-9 minutes at 375 degrees - do not brown.  Immediately remove from pan to cool.

Filling - cream 1/4 c. butter, 3/4 c. powdered sugar, 1 t. vanilla, few drops of desired food coloring, few drops of water.  Spread light layer of filling between 2 wafers to make a little sandwich.  The cookies are very fragile so you'll learn quickly to handle with care! 


Next up is my Grandma Taylor's sour cream cookie recipe.  This is a treasured family recipe that I may catch some flack for sharing on the interwebs but since there are plenty of sour cream cookies to be found out there, I'm going to share since I think this one is the best.  This comes from my English heritage and some would know them as a tea biscuit.  The traditional frosting uses grated orange peel but my mom and some of her siblings didn't like that so regular frosting was used or just butter.  Definitely another childhood favorite. 


Grandma Taylor's Sour Cream Cookies
2 eggs
1 c. sugar
1 c. butter
1 c. sour cream - room temp
1 tsp. vanilla
1/2 tsp salt
1 tsp. baking soda
6 c. flour


Cream butter and sugar, add eggs, vanilla. Stir sour cream and baking soda just until it starts to puff up. Add to butter mix. Add remaining ingredients. Roll out on floured space 1/2 in thick. Bake at 350 degrees on lower shelf of oven until they "puff up" then move to top shelf and finish baking (total of 8-10 min). Cool and frost with your frosting of choice. 


Here's my final baking day stash this year which doesn't really do it justice.  I love the variety that I get from baking day but most of all, getting to spend time with some fabulous women, including my best friend, Mel.  Happy Christmas baking, everyone!