Showing posts with label Christmas goodies. Show all posts

Thursday, December 19, 2013

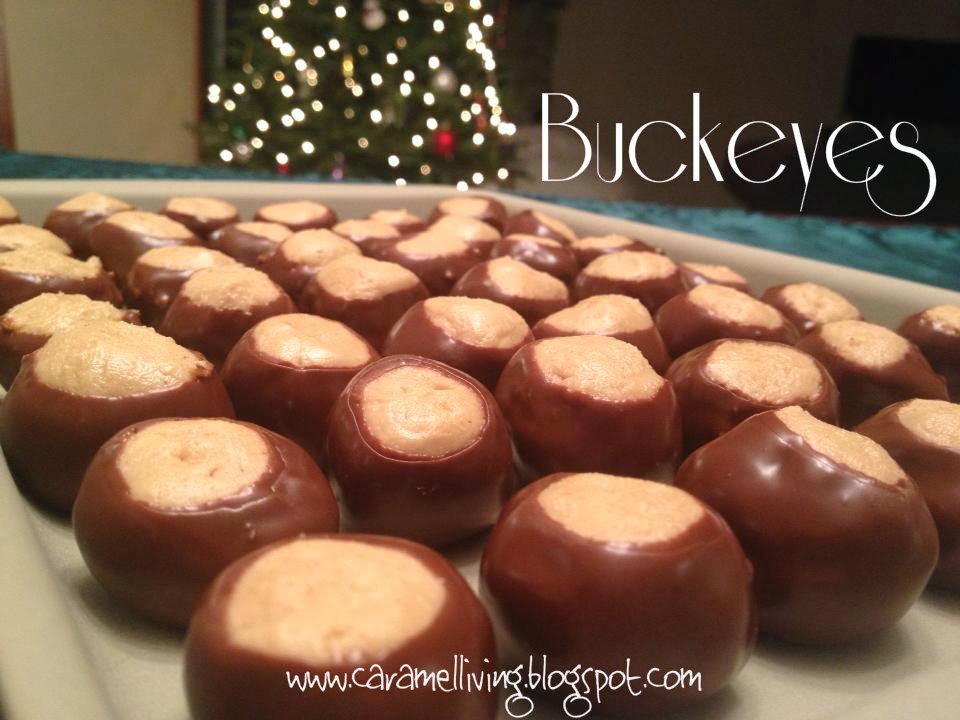
Ladies and Gentlemen, I present to you...Buckeyes!


Well hello there, kind and wonderful followers! It's Cara. Yes, I'm still alive after all this time. I'll spare you the details but just want to say that I've missed posting and hearing from people, particularly on Facebook where we get most of our activity.

As Mel mentioned last year, I host a Christmas Baking Day every year and have done so since college.  I love this tradition, particularly since there are some friends that I unfortunately only see at Baking Day! Mel had to miss it this year which made both of us very sad but we've got plenty of years to make up for it!

A long, long, long time ago, one of my college roommates contributed the recipe for Buckeyes. WTHeck are Buckeyes? Aren't they a college mascot? Ohio's nickname? A nut? All of the above. Oddly enough, the buckeye nut is poisonous in its raw state. I'm not sure who thought this would be a good mascot but what I do know is that this little chocolate and peanut butter treat in honor of the buckeye nut is out of this world. It has become a regular item we make at Baking Day. And of course, any time a group of girls get together and have to form little balls, there are sure to be some comedic exchanges. Oh, and the wine probably comes into play, too.

Enjoy and happy holidays!!! 

Buckeyes
Recipe adapted from An Alli Event
  • 1/2 cup butter
  • 1 lb. powdered sugar
  • 1-1/4 cups peanut butter
  • 1 tsp vanilla
  • 1/4 block paraffin
  • 12 oz chocolate chips (whatever kind suits your taste - semi-sweet, milk, dark)
  1. Mix butter, powdered sugar, peanut butter and vanilla until smooth. Form into 1" balls and place on a cookie sheet. Chill balls for about 15 minutes. 
  2. While the balls are chilling, melt paraffin and chocolate chips in a double boiler (I started with the wax first since it takes longer to melt). 
  3. Using a toothpick, dip the balls in the chocolate, coating about 3/4 of the ball. Place them on wax paper until firm. If you are picky like me, I use my fingertip to close the hole the toothpick makes. I personally think they look a little weird with the hole.
  4. Chill and keep refrigerated until ready to serve - the texture is best if you let them warm up a bit prior to serving.


Sunday, December 23, 2012

More Cookies...

So here its been a week since I hosted my annual baking day and I'm just now sharing some of my recipes.  Anyone else out there need another week until Christmas???  Sometimes I feel like I'm the only one that doesn't have all my shopping done the day after Thanksgiving.  I don't like to rush the holidays and to be honest, my time management skills seemed to have disappeared when I became a parent.  I do make my annual baking day a priority though no matter how frazzled I feel in December.  I've been hosting it ever since college.  I've kept it primarily with the same group of gals but the process has definitely evolved over the years.  Currently, everyone makes 2-3 cookies/candies at home and then brings 1-2 recipes (and the ingredients) to make with the group.  We enjoy baking together so we didn't want to eliminate the baking fun but it takes TOO long to bake everything together.  Please feel free to share in the comments how your cookie exchange works!

This year, I was excited to try the Mint Oreo Truffle recipe I found in the magical land of Pinterest.  You can find that recipe here.  Oh my word were those babies good.  I'll save that recipe to make any time I'm in the doghouse with Studmuffin.

Next little goodie I've seen using Nutter Butters but my youngest has a peanut sensitivity so I had to find something else for the base.  I think these Rudolph Mallows turned out pretty cute and were yummy.  There's no formal recipe - I melted chocolate almond bark, dipped marshmallows in it and placed halved pretzels and red M&Ms to make the antlers and noses.


Ok, these are one of my favorites from my childhood.  My aunt introduced Cream Wafers one year at a holiday gathering and I was hooked.  Just a heads up, the dough is very pesky but they are so worth the hassle.


Cream Wafers
Cookie
1 c. butter at room temp
1/3 c. whipping cream
2 c. flour
small bowl of approx. 1/2 c. sugar

Mix well, cover & chill.  Roll about 1/3 of the dough on floured surface to about 1/8 inch thick.  Cut into 1 1/2 inch circles and set both sides into sugar bowl to lightly cover. After placing on baking sheet, prick each cookie a few times with a fork.  Cook 7-9 minutes at 375 degrees - do not brown.  Immediately remove from pan to cool.

Filling - cream 1/4 c. butter, 3/4 c. powdered sugar, 1 t. vanilla, few drops of desired food coloring, few drops of water.  Spread light layer of filling between 2 wafers to make a little sandwich.  The cookies are very fragile so you'll learn quickly to handle with care! 


Next up is my Grandma Taylor's sour cream cookie recipe.  This is a treasured family recipe that I may catch some flack for sharing on the interwebs but since there are plenty of sour cream cookies to be found out there, I'm going to share since I think this one is the best.  This comes from my English heritage and some would know them as a tea biscuit.  The traditional frosting uses grated orange peel but my mom and some of her siblings didn't like that so regular frosting was used or just butter.  Definitely another childhood favorite. 


Grandma Taylor's Sour Cream Cookies
2 eggs
1 c. sugar
1 c. butter
1 c. sour cream - room temp
1 tsp. vanilla
1/2 tsp salt
1 tsp. baking soda
6 c. flour


Cream butter and sugar, add eggs, vanilla. Stir sour cream and baking soda just until it starts to puff up. Add to butter mix. Add remaining ingredients. Roll out on floured space 1/2 in thick. Bake at 350 degrees on lower shelf of oven until they "puff up" then move to top shelf and finish baking (total of 8-10 min). Cool and frost with your frosting of choice. 


Here's my final baking day stash this year which doesn't really do it justice.  I love the variety that I get from baking day but most of all, getting to spend time with some fabulous women, including my best friend, Mel.  Happy Christmas baking, everyone!
 

Wednesday, December 19, 2012

Cookie exchange


Last weekend, Cara hosted a “baking day”. She has hosted this day for many years. There are usually at least 4 people. This means… lots of goodies!!

We all bring 2 or 3 pre-made treats and make 1 more at the actual exchange. I have never left a “baking day” and felt disappointed. I guess that’s not true. I’m disappointed that I have to share the goodies with my family. My family turns into leeches as soon as I walk through the door. Their eyes grow twice the size and they begin to drool like they have a hole in their lip. All for good reason.

Here are just some of the cookies and goodies…

Almond Sugar Cookies:

I found this recipe on this blog. I wanted something different and more… sophisticated, if you will. I absolutely love a good sugar cookie. It’s probably my favorite. They must be soft though. These cookies meet my requirements. They are soft and delicious with a flare of almond flavoring. 

1 1/2 C white sugar
2/3 C unsalted butter (cold)
2/3 C shortening (room temp)
2 eggs
2 tsp almond extract
2 3/4 C cake flour
1 C all purpose flour
1 Tbsp cornstarch
2 tsp baking powder
1/2 tsp salt
sugar in the raw (*My thought… I used regular sugar. A course sugar would have made it better. Hindsight… wish I would have used colored sugar*)

  • Preheat oven to 350 degrees and prepare baking sheet with parchment or silicone baking mat.
  • Cream sugar, butter and shortening. Stir in eggs and almond extract.
  • Combine flour, cornstarch, baking powder and salt. Add to butter/egg mixture.
  • Use electric mixture to ensure dough is thoroughly combined.
  • Chill dough in fridge for 30 minutes.
  • Roll about 2 tsp of dough into a ball and roll in raw sugar. Place on prepared pan.
  • Bake cookies for 7-10 minutes. Remove from oven and gently press the tops of the cookies flat with the back of a spoon while they are still warm and pliable (not totally necessary).
  • Return bowl of dough to fridge in between baking batches.
  • Move cookies from cookie sheet to cooling rack.  Allow to cool completely.
  • A tip: DO NOT bake cookies longer than 7-8 minutes (*Mel’s thought: I baked mine for about 10 minutes because my oven must be different than the original blogger’s. Use your own discretion. You do want the cookies to appear slightly under baked. This is true for most cookies, IMO. They will firm up as they cool). 
Almond Sugar Cookies

Holiday Cake Cookies

These cookies looked yummy and very kid friendly! I could tell as I was mixing the ingredients together this would be a very rich cookie. I was right. Too rich for my taste buds. I was not a fan. My kids… not a fan either. The recipe calls for an entire box of cake mix. IF I was to make these cookies again I would use about half of the box and substitute flour for the other half.
You are probably wondering why I am posting this if I didn’t like them. Even if I didn’t enjoy them, maybe a reader will. With the half box/extra flour adjustment, I think they might be pretty good. 

Original recipe: here

1 box (18.25 oz) vanilla/white cake mix
1 teaspoon baking powder
2 large eggs
1/3 cup vegetable/canola oil
1/2 teaspoon vanilla extract
1 cup sprinkles
  • Preheat oven to 350F. Use parchment paper or a silicone baking mat. Set aside.
  • In a large bowl, mix together the cake mix and baking powder. Set aside. In a smaller bowl, whisk together the eggs, oil, and vanilla by hand. Add the egg mixture to the cake mixture and stir to form a dough- stir vigorously until all of the pockets of dry cake mix are gone.  Gently mix in the sprinkles – you do not want to dye the cookie dough by over stirring the sprinkles.
  • Drop rounded 1-inch balls of dough onto prepared baking sheet.  
  • Bake for 9 minutes – do not let the cookies get brown.  Allow to cool on baking sheet for 3 minutes; they will be very soft at first. As they cool, the tops will settle down so you will not have to press the cookies down yourself. Transfer to a wire rack to cool completely.

Holiday Cake Cookies

 
Saltine Toffee:

These were all the rage at my son’s school fundraiser (bake sale) back in October. Chocolate, saltine crackers and homemade toffee. Hmmm… I was quite intrigued. I knew it would make my Christmas baking list. This goodie is pretty tasty. One thing I would do differently is boil the brown sugar/butter mixture a bit longer (until sugar dissolved more). 

1 cup butter (no margarine)
1 cup brown sugar
Enough crackers to fill a cookie sheet
1 bag of chocolate chips

  • Preheat oven to 350 degrees. Spray cookie sheet with non-stick cooking spray then cover with foil. Spray the foil with non-stick cooking spray.
  • Spread saltines on cookie sheet, creating a flat layer.
  • Mix brown sugar and butter together in a saucepan, stir frequently, once the mixture begins to boil reduce heat to simmer. Simmer for about 5 minutes or until mixture has reached a nice thick consistency.
  • Pour thickened mixture over saltines.
  • Spread toffee evenly over crackers.
  • Bake until toffee becomes bubbly (about 5-10 minutes).  
  • Remove from oven and let it sit for 5 minutes.  
  • Shake chocolate chips on top and let them melt.  
  • Spread chocolate evenly over crackers/toffee.  
  • Let cool or put in the fridge to harden.  
  • After about an hour, break off a piece and taste. Yum!
  • Break into a bunch of pieces. Some small, some large, it’s up to you.
  • Freeze or refrigerate leftovers… if there are any


Saltine Toffee
 
Chocolate Peanut Butter Cheese Crackers

Yum, yum and yum! I didn't make these at the exchange, but I feel the need to share them. These are so kid (and adult) friendly. They are also very cute!

Box of cheese crackers (Cheese Its, Cheese Nips)
Peanut Butter
Chocolate chips 
Sprinkles

  • Prepare parchment paper on table or cookie sheet.
  • Spread PB on crackers and top each one with another cracker (sandwich... cracker, PB, cracker).
  • Melt chips in a double boiler.
  • Dip cheese cracker sandwich into melted chocolate.
  • Place chocolate covered sandwich on parchment paper and add sprinkles.
  • Let sandwiches harden.

Chocolate Peanut Butter Cheese Crackers


MERRY CHRISTMAS!