Showing posts with label Cookies. Show all posts

Saturday, February 21, 2015

Monster Cookie Dough Dip

Today I made an awesome dip that I pinned a long time ago. I found it on The Girl Who Ate Everything's blog. I've made a few recipes of hers and they have always turned out great. Does anyone else have the problem of things not turning out as delicious as the blogger's pictures look? I made some chocolate & peanut butter brownie bars last week, and I followed the blogger's recipe exactly! Only problem... they turned out very, very strange. But anyway, TGWAE's recipes have always been spot on for me. Makes a girl like me happy.


This dip is no different. I followed her recipe exactly and ended up with a delicious, creamy cookie dough tasting dip. Bonus, there are no raw eggs so your chances of getting salmonella are low. Woohoo, am I right? 

You can serve this dip with graham crackers (we tried chocolate, YUM), Nilla Wafers, or for a sweet and salty treat try Ritz Crackers. Just eating it with a spoon works too. Or at least, that's what I've been told anyway. 


Tuesday, December 24, 2013

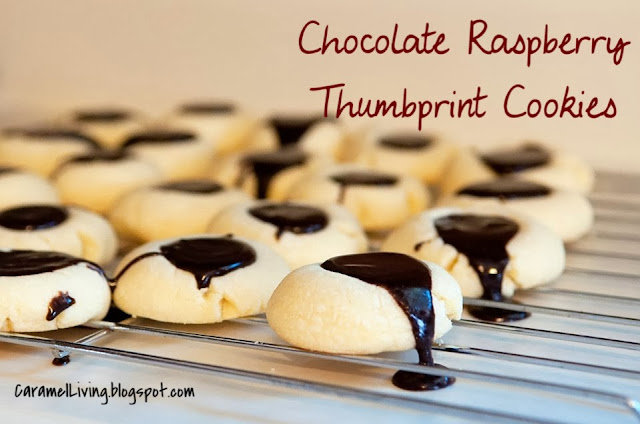
Chocolate Raspberry Thumbprint Cookies

I love myself some thumbprint cookies. Like... I really really love them. The texture is just right, they are soft and crumbly. The taste of the cookie is simple yet very delicious. The little bit of almond extract adds a perfect little perk to these delights. Once you add your melted chocolate to the top... hold on to your shorts, toupees, glasses or whatever else you don't want flying off your body. Yes, they are that good.


So here we go...

Cookies (adapted recipe from here):
1 cup butter
1 cup powdered sugar
2 egg yolks
1 tsp vanilla
1/2 tsp almond extract
2 1/4 cup flour
1/2 tsp baking powder
1/4 tsp salt

Melted chocolate topping:
1 cup dark chocolate raspberry baking chips
4 tbsp heavy whipping cream


Cream together butter and powdered sugar until the texture is smooth. Add egg yolks, vanilla extract and almond extract. Mix well. In a separate bowl combine flour, baking powder and salt. Slowly add the flour mixture to the butter/sugar mixture.

Preheat oven to 350 and prepare a cookie sheet by using parchment paper or by spraying the sheet with a light coating of cooking spray.

Roll dough into small balls, about 1 inch. Place on cookie sheet and press a small indent into the dough ball. Use your thumb or the handle of a wooden spoon.

Bake cookies for 10 minutes. Remove from oven and let them rest on the pan for a minute or two before moving them to the cooling rack.

For the topping, combine chips and cream together in a microwaveable bowl. Start by microwaving the two ingredients for 1 minute. Remove and stir together. Keep microwaving until the chocolate has a smooth texture.

I let the cookies cool for about 45 minutes before adding the chocolate. I waited 2 seconds, maybe less, to eat one. The chocolate eventually hardens but I can not resist eating at least one cookie with all of its melted chocolate goodness. I used a spoon to drip the chocolate into the indent of the cookie. Another way is to pour the chocolate into a Ziploc bag and cut off a small corner and squeeze the chocolate onto the cookie.


Thursday, December 5, 2013

Peppermint Hot Cocoa Blossoms

Do love a good chocolate and peppermint candy cane combination? If so, these cookies are exactly what you have been looking for! A chocolate cookie topped with a Candy Cane Hersey's Kiss. They are like little drops of deliciousness.


Don't like mint? No worries, I am not much of a fan either. I make mint goodies because I know my family and friends enjoy it. So if you're not diggin' the mint... try substituting a Hug Hersey's Kiss or maybe a Caramel Hersey's Kiss. Top it anyway you like it. Go ahead and be creative.

Peppermint Hot Cocoa Blossoms

2 cups flour
1/4 tsp baking soda
1/4 tsp salt
1/3 cup cocoa
1/2 cup (1 stick) butter, softened
1 cup sugar

1 egg
1 1/4 tsp vanilla
2 tbsp milk

1 bag Candy Cane Hersey's Kisses
Small bowl of powdered sugar

Add flour, baking soda, salt and cocoa together in a medium mixing bowl. Cream together sugar and butter. Add the egg. Mix well. Add vanilla. Mix well. Add about 1/2 of the flour mixture to the sugar mixture and mix. Add 1 tbsp of milk as it mixes. Add the remaining flour mixture and mix. Add in last tbsp pf milk as it mixes.

The dough is very easy to play with and doesn't require any refrigeration to firm it up. Roll dough into 1 inch balls. Roll balls in powdered sugar and bake for 8-10 minutes. Remove cookies while they are still soft and let them rest for 2 or 3 minutes. Add the Candy Cane Kiss and move to a cooling rack.


I also made these cookies without the chocolate. The ingredients and instructions are exactly the same except the addition of cocoa powder and instead of powdered sugar I used red sugar sprinkles. This recipe is on the back of the Candy Cane Kiss bag.


Tuesday, November 19, 2013

Carrot Cake Whoopie Pies

Back in May I donated "one baked good once a month for a year" to an auction held at our church with proceeds going to my daughter's youth group mission trip. I was excited right away about the all of the different options I had to chose from. I went Pinterest shopping, but up until now I hadn't ventured too much out of my past experiments.


Some of the recipes I've made are:

Pumpkin Bread with a cinnamon glaze (missed an opportunity to blog this one)
Peanut Butter Chocolate Chip Muffins
Better Than Sex Cake with caramel and Rolos
Scones


This month I made Carrot Cake Whoopie Pies. My original plan was to make everything homemade but in the end I realized time wise that wasn't going to work. I then decided to use a cake mix in place of a from-scratch dough. It made the process very painless and quick.


What you'll need:
copycat from What's Baking in the Barbershop?

Carrot Cake Cookies
One box of carrot cake cake mix
2 eggs
1/4 cup vegetable oil

Cream Cheese Frosting
8oz cream cheese, softened
5 Tbsp butter, softened
2 tsp vanilla
2 1/2 cups powered sugar
1 tsp fresh lemon juice

For the cookies:

Mix together cake mix, eggs and oil. It seems a little sticky in the beginning but just keep whisking or stirring and it will come together nicely.

Preheat oven to 375. Prepare a cookie sheet with spray, parchment paper or a baking mat. Spoon dough onto the pan. I used two spoons. One to spoon it out of the bowl and the other to guide it off the spoon and onto the pan. Bake for about 9-10 minutes. Remove from oven and let rest for 2-3 minutes. Place on baking rack to cool.


For the frosting:


In a stand mixer, combine cream cheese and butter. Cream together. Mix in vanilla. Slowly add the powdered sugar. Finally mix in lemon juice. Place in  refrigerator 25-30 minutes.

Put them together:

Once cookies are completely cool and frosting has set, it's time to make the whoopie pie. Find cookies that are roughly the same size. Spread a generous amount of frosting on the bottom of one cookie. Gently press the other cookie on top of the frosting. There you go! You are done and your tummy will be pleased. Pleased indeed!


Thursday, November 7, 2013

Pumpkin Kiss Snickerdoodle Cookies

Snickerdoodle and pumpkin make the perfect marriage in these cookies. I discovered Pumpkin Kisses last Fall. Alone the Kisses are okay.... very pumpkin-y. But together with the right cookies or bars they are super duper!


Snickerdoodle cookies original recipe from Lovin' From The Oven


1/2 cup butter, softened
1/2 cup white sugar
1/3 cup brown sugar
1 egg
1/2 tsp vanilla
1 1/2 cups flour
1/4 tsp salt
1/2 tsp baking soda
1/4 tsp cream of tartar

2 tbsp white sugar
1 tsp ground cinnamon

Bag of Pumpkin Flavored Hershey's Kisses

In a bowl, combine flour, salt, baking and cream of tartar. Set aside. In another bowl, cream together sugars and butter. Add egg and mix. Add vanilla and mix again. Slowly mix in flour mixture.

Place dough in the refrigerator to firm up for about 30 mins.

Preheat oven to 300. Prepare a cookie sheet with parchment paper or a baking mat.

In a small bowl, combine sugar and cinnamon. Roll each dough into the sugar/cinnamon before placing it on the cookie sheet. Bake for 12-14 minutes. Cookies may seem undercooked but they will firm up. 

These cookies are amazing even without the Kiss

Once out of the oven, add the kiss. 


Enjoy!

Tuesday, November 5, 2013

Chippy Bars with Peanut Butter Frosting & Chocolate Drizzle

I have a sweet tooth. I think it's safe to say a lot of people do. Life is just more fun with sweets. Plain and simple. 


I love making these bars. They are easy and always a crowd pleaser. By adding a peanut butter frosting and chocolate drizzle, you can knock some socks off with tastiness and eye appeal. The platter will be empty before the party even starts.


Cookies (Tollhouse recipe):

2 1/4 cup flour
1 tsp baking soda
1 tsp salt
2 sticks butter, softened
3/4 cup granulated sugar
3/4 cup brown sugar
1 tsp vanilla 
2 large eggs
1 1/2 cup chocolate chips

Peanut Butter Frosting:

6 tbsp butter
1 tbsp light corn syrup 

Chocolate Drizzle:

1/2 cup chocolate chips
1 tbsp shortening


For cookies:

In a bowl combine flour, baking soda and salt. Set aside. In a separate bowl, mix butter, sugars and vanilla until creamy. Add eggs, one at a time, mixing well after each addition. Add chips and mix just until chips are evenly distributed.

Preheat oven to 350. Prepare a 9x13 baking dish with cooking spray or rub olive oil on bottom and sides. 

Bake for about 25 minutes or until a knife stuck in the middle of the bars comes out clean.

For Frosting:

Melt together chips and butter, once smooth add in corn syrup and mix well. Pour over cooled chippy bars. Let the bars cool on the counter until frosting has set then chill in fridge for 2 hours. 

For Drizzle:

Melt together chips and shortening in microwave for 45 seconds or so. Careful not to burn. Stir well and drizzle over bars. 

Enjoy!

Thursday, June 27, 2013

Sugar Cookie Sandwiches


Sparklers, celebration and food!! Fourth of July is such a great time of the year. We typically head over to my parents’ cabin for the Fourth. We swim, go for boat rides, eat and be merry. There is a Fourth of July boat parade which is a blast because a water fight with water balloons and water guns is bound to happen between the boats and viewers.

Fourth of July = FUN, yummy treats and more fun and more yummy treats!


Today I have a fun cookie, along with a kick butt frosting recipe, to add to your holiday menu. These cookies are cute, fun and delicious. Like I’ve mentioned, oh I don't know... a few hundreds time, I enjoy a soft and chewy sugar cookie. The recipe that follows will leave you with just that. 

Sugar Cookie Sandwiches

  • 2 ¾ cups all-purpose flour
  • 1 tsp baking soda
  • ½ tsp baking powder
  • 1 ½ cups white sugar
  • 1 cup butter, softened
  • 1 egg
  • 1 tsp vanilla

  • Blue food coloring
  • Red food coloring
  • Sprinkles
Preheat oven to 350. Prepare cookie sheet with a baking mat or parchment paper. 

Combine flour, baking soda and baking power in a bowl and set aside. In another bowl, cream together butter and sugar. Mix in egg and vanilla. Gradually add flour mixture to sugar mixture. I usually do this in three steps… add a bit of flour, mix well and repeat two more times.

Separate dough into two even halves and place them in separate mixing bowls. Add red food coloring to one half and blue to the other. I used about 1/2-3/4 tbsp of each color.


Roll dough into large blueberry size balls. Really you can make them any size but this size makes them easy to pop. And by pop I mean… into my mouth.  Roll the small balls in sugar sprinkles and place on the prepared cookie sheet. 


Bake cookies for about 3-5 minutes, remove from oven and let them rest on the cookie sheet for another 2 minutes. I take my cookies out of the oven while they are still quite soft looking. They will continue to “bake” a little longer as they rest. (Note:  If you enjoy a crisp cookie, bake them a little longer)

These little guys are about the size of a quarter
Once the cookies are completely cool we can build our sandwiches. This frosting is amazing and very versatile. It can be used on cakes, cupcakes, cookies, you name it. It's light and creamy, but also sets very nicely and doesn't run like other whipped frostings I've tried. If you are looking for a new frosting recipe, here it is!


Whipped Cream Frosting (original recipe) :

1 8oz cream cheese, softened
1/4 cup white sugar
1/2 tsp vanilla extract
1/4 tsp almond extract
1 cup heavy cream

Blend together cream cheese, sugar, vanilla extract and almond extract. Once the texture is creamy slowly whisk in heavy cream. Whisk until it reaches a stiff peak. I whisked mine for about 6 minutes.


To build the sandwiches, take one cookie and apply frosting to the top. Take another cookie and gently press the bottom side down on to the frosted cookie. There you go. Your cookie sandwich is complete.


You can eat these cookies right away or chill them. I like them better chilled.


Since I didn't 100 mini size cookie sandwiches I made some larger ones too. I combined one red doughball and one blue doughball.


 As they baked they attached to one another giving me these:


The kids LOVED these. Even more than the cookie sandwiches!


Enjoy!

Monday, February 25, 2013

Cookie Caramel Brownies


Here’s what I know… making caramel squares is not my calling. Yikes! These puppies are hard to make. Last weekend, I attempted them twice. Twice I failed. The first was a complete waste. The second batch I was able to save. They were too soft to wrap but I knew I could find a use for it.

I should be able to make caramel if we’re going to unintentionally promote it. As we’ve said before, we didn’t name our blog “Caramel Living” because we have an obsession with caramel.

Last week I contemplated how I would use this too-soft caramel. I had several thoughts… pancakes, ice cream, caramel apple pizza (a recipe provided at our caramel party) and so on and so forth. I was suddenly excited to bake something with this caramel. 

I decided on making a combination of bars. One half would be brownie. The other half would be chocolate chip cookie. A layer of caramel would divide them. The rest is history.


Brownies (Adapted from: Allrecipes):
*you can also use Cara's recipe

2 sticks melted butter
1 ½ C white sugar
2 tsp vanilla
3 eggs
1 C flour
2/3 C unsweetened cocoa
½ tsp baking powder
½ tsp salt

Mix together butter, sugar and vanilla. Next add eggs, one at a time, mixing in between. Set aside.
Combine flour, cocoa, baking powder and salt. Gradually mix flour mixture into butter mixture.

Preheat oven to 350°. Grease 9x13 baking pan. Spread the brownie mix evenly into the pan. Set aside.

Spread brownie dough

Let’s get the cookies dough ready.

Cookies:

I cut my normal recipe in half.

1 1/3 C flour
½ tsp baking soda
½ tsp salt
Just under ½ C white sugar
Just under ½ C brown sugar
1 stick of unsalted butter, softened
½ tsp vanilla
1 egg
½ - ¾ C chocolate chips

Combine flour, baking soda and salt. Set aside
Mix together white sugar, brown sugar and butter. Next add vanilla and mix. Add egg and mix. Add chocolate chips and mix. Gradually mix flour mixture into the sugar mixture.

For the caramel sauce, try Cara’s homemade recipe.

Now it’s time to bring it all together. If your caramel is thick, warm it just enough to make it easy to pour over the brownie mix. I warmed mine for about 35 seconds.

Pour caramel over brownie dough

Now let’s add the cookie dough. I took a handful of the dough and used my hands to gently pull and press it out (before adding it to the pan). Next I laid the dough throughout the pan, leaving caramel rivers here and there.

Lay cookie dough over caramel

Bake the bars for 30-40 minutes.
Let cool completely (or you will burn your mouth off like I did) then devour.